Pages

Thursday, December 25, 2014

Merry Christmas!

Well, today brings our countdown to a close. I think it went pretty well, don't you? I will definitely make this an annual thing!


For me, Christmas is one of the most special holidays. God loved us so much that He was willing to send his only Son to  Earth! I think that that is a perfect reason to rejoice! Joy to the World, who's with me?!

Merry Christmas to all, and to all a good night! 

Tuesday, December 23, 2014

5 Best Teas for Christmas and Winter

2 days until Christmas! I cannot believe that tomorrow is Christmas Eve already!

Do you know what I really can't believe? That I missed three whole days of my countdown! Christmas with my mom's side of the family along with preparation for Christmas has put my blogging into a tailspin.

As I'm sure you all know by now, my very favorite beverage is tea. I don't care what kind. If it's tea, I'll drink it. Therefore, during the fall I began posting my five favorite teas for the season. Now, here are my five favorite teas for the winter!!


5 Best Teas for Christmas and Winter

#1: Peppermint from Bigelow

I think this one is pretty self-explanatory.

#2: Holiday Chai from Stash Teas

My mom and I are goo-goo for anything chai! The rich, almost smokey flavor of chai goes perfectly with Christmas-y accents in the tea. A splash of eggnog totally makes this already amazing tea.

#3: White Christmas from Stash Teas

This tea is a light, refreshing, pepperminty pop perfect for when you're in the mood for a festive tea.

#4: Christmas Eve from Stash Teas

This tea is perfection. I'm not joking! A spicy, savory flavor is perfect for relaxing with family on Christmas Eve.

#5: Earl Grey

Earl Grey is pretty much the most refined and sophisticated tea there is. This robust winter tea is great for settling in on a long winter's night. (I usually buy Twining's.)


Cheers! (And merry Christmas Eve eve!)


Saturday, December 20, 2014

2014 Guide to Holiday Dressing!

5 days until Christmas!! I absolutely cannot wait!

A lot of times, I wait until the last minute to scrape together a lackluster outfit for a holiday event. But this year, I am prepared for Christmas! (I bought my dress in November.) Have a look into my closet to find a great outfit for any holiday occasion!


Festive Casual


With a spirited tank, long sweater, jeans, and lace-up boots, you can show holiday cheer without being over the top. (My tank has a cute little design of polar bears tangled up in Christmas lights on it!) A side ponytail looks cute as a button with this outfit! (Sweater: Charlotte Russe; Tank: Aeropostale; Jeans: JC Penney; Boots: Famous Footwear)


Christmas Party Cute


Red leggings, a shimmery white-silver tank, and Christmas accessories make for a festive, fun look sure to turn heads at any Christmas party! (Hat: Target; Sweater: The Limited; Tank: Aeropostale; Leggings: Charlotte Russe; Boots: Famous Footwear)


Christmas Morning Elegance


And finally, here is the outfit that I will be wearing for Christmas. I will also be wearing the outfit for an orchestra audition in January. Complete the look with a Twist 'n' Tuck updo! You can find the tutorial here. (Sweater: The Limited; Dress: Charlotte Russe; Shoes: Shoe Carnival)

I hope your holidays are stylish and classy!!


Thursday, December 18, 2014

Twist 'n' Tuck Updo

Only a WEEK until Christmas!!

For today's countdown post I am going to share with you a cute, easy updo for Christmas! I love this hairstyle because you can put it with a dress for an elegant and sophisticated look, or put it with jeans for more of a relaxed, chic look!

Twist 'n' Tuck Updo

Materials

-1 hair tie (a color that matches your hair works nicely)
-bobby pins
-a bow or clip-on flower

Directions

Put your hair in a low ponytail.


Right above the hair tie, make a gap.


Twist up the ponytail through the gap.


Divide the ponytail into two sections and twist them over the original twist. Pin in place. If you have longer hair, you may need to wrap it around several times.


Optional: Pin a bow or flower on the side of your twists.


And there you have it! An easy, classy 'do perfect for any occasion :) 


Wednesday, December 17, 2014

DIY Bow Wall Design

8 days until Christmas!

If you are still putting up Christmas decorations, I beg you to try this adorable idea. May I present to you: Christmas bow decor! Just slap some stick-on bows on a wall, door, etc. in the shape that you want and boom! A cute, different way of decorating that will knock the socks off of your holiday guests!


I chose to arrange my bows in the shape of a heart on the door of my closet. You can use red, green, white, silver, and gold bows to make a festive design for the holiday season.


DIY Bow Wall Design 

Materials

-about 30 stick-on Christmas bows (any color)
-roll of tape

Directions

Roll a piece of tape so that there is sticky on both sides. (It will be tube shaped.) Put it on the underside of a Christmas bow. Repeat until you have made your bows into desired design. You may need to relocate some bows to change the shape of the design or if the colors put together clash. 


If you don't want to risk ruining your walls with tape, you can cut a piece of clean, white fabric to the shape of your desired design and put the bows on there.  Then, just adhere it to your wall with a few pushpins. 

Happy decorating! 

Tuesday, December 16, 2014

Our Christmas Decorations

Nine days until Christmas! We're in the home stretch!!

It occurred to me the other day that I talked about having decorations up but never posted pictures. And if that's not a crime, I don't know what is!


Here's our beautiful tree! Every year, we string light strands through each individual branchlet to give our tree a fairy-infested look. The past couple of years, it has been me lighting the tree. As scratchy as  a job it is, I think our beautiful tree is always worth it in the end :)


Next, we have our entryway. Since the stairs are right in front of the front door, we do our best to make them look festive during the holiday season when we have our most company. In the dining room (on the right) you can see the little tree that my sister and I put up with our little ornaments that we made when we were little.


This is my favorite ornament. It holds no special memories or meaning, but I just think it always looks pretty and festive!


I have always been cracked up by this ornament! It looks like Santa is bungee jumping off the tree using his hat as a rope!!

Does your family have any fun traditions/ decorations? Let me know in the comments!!

Sunday, December 14, 2014

Springerles (Part Two)

11 days until Christmas!

Now that we've got the technicalities of this thing over with, let's move on to everyone's focus: springerles. As I said yesterday, they are a perfect Christmas cookie. The lightness of the texture and the taste makes this German sweet a great way to end a heavy holiday meal.

Yesterday I mixed up the dough, rolled it out, implanted the design, and left it to sit overnight covered by a thin cloth. Today, I baked them, and I have to say that they came out amazing!


My springerles came out a little less poofy than they usually are, but I think I might've rolled them out a bit too thin. I would recommend rolling them out to about the thickness of a pencil for them to rise to regular size. But hey, at least the flavor is spot on!


If you're looking for a new Christmas cookie instead of all the old traditional favorites, this is definitely the route to go!! You can find the complete recipe here.


Saturday, December 13, 2014

Springerles (Part One)

Let's kick off this Christmas countdown!!

12 days until Christmas, and man-oh-man am I excited!!

Today I am presenting you to the best Christmas cookie in the history of Christmas cookies: the springerle. Springerles are anise-flavored German cookies that could be described as pillowy poofs of heaven. Since a big majority of the southern Indiana population has some German blood running through their veins, a Christmas get-together is never without this amazing treat.

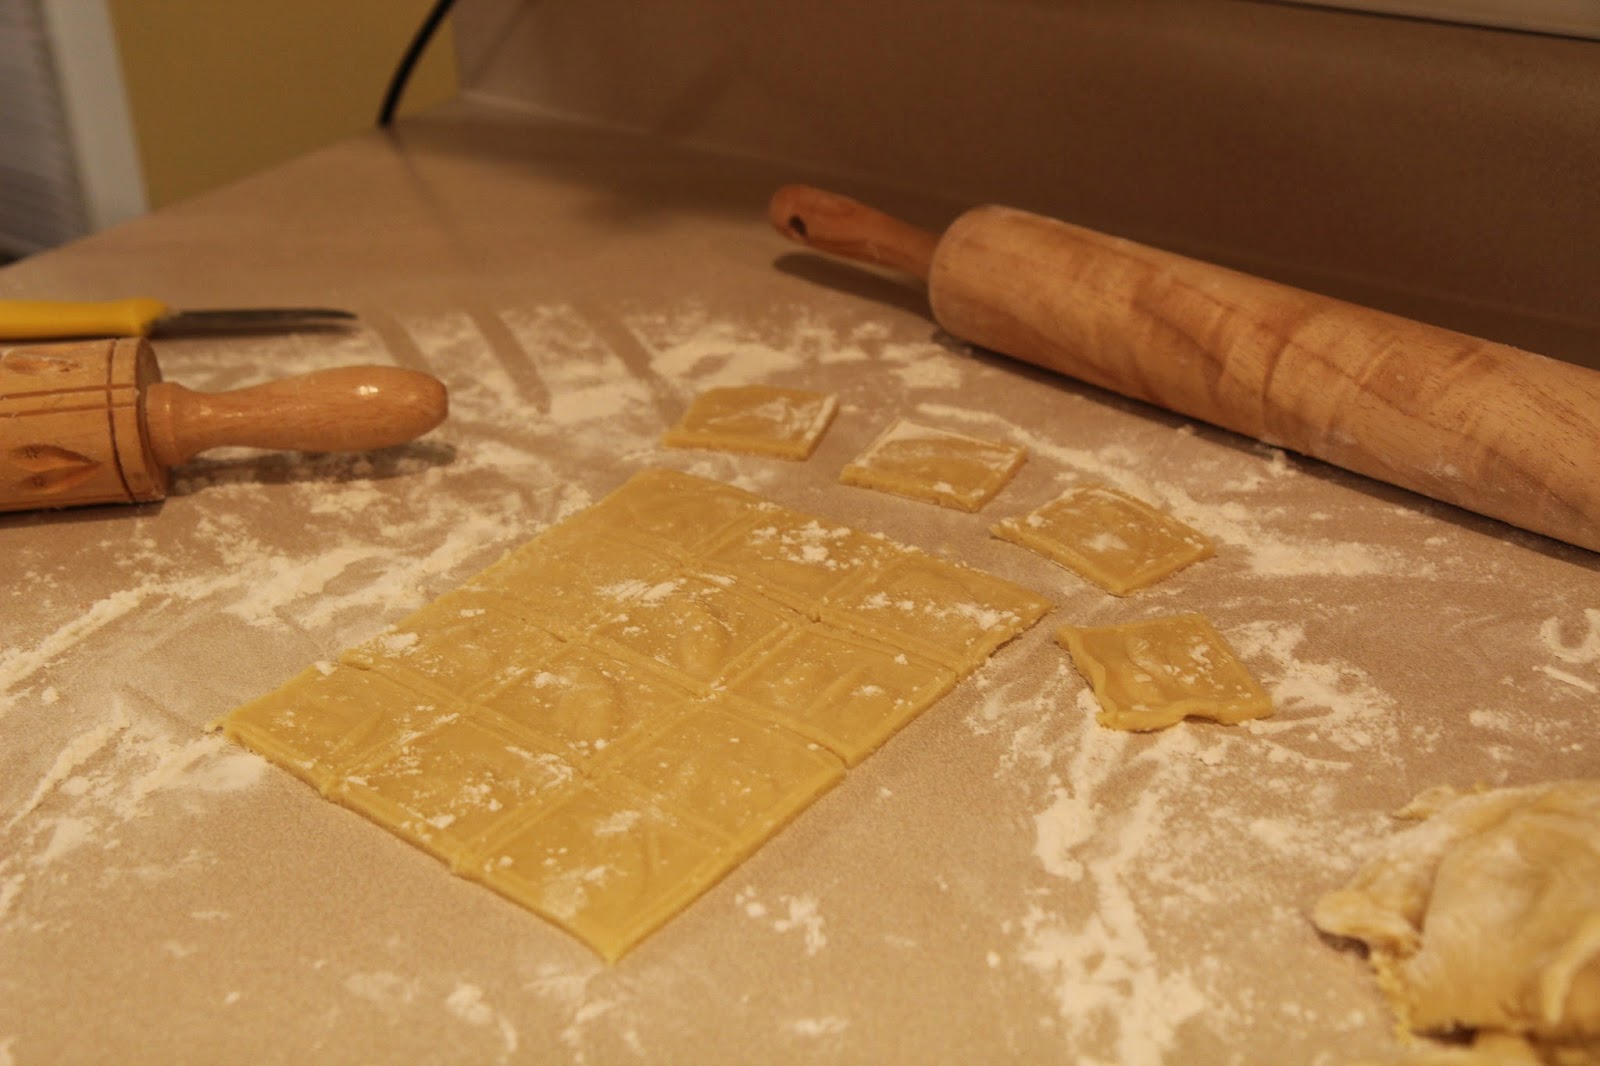
Springerles dough is made, rolled out, and rolled over with a special engraved rolling pin the night before you bake them. (I'm not sure why, but I'm sure sitting overnight does something to make this wonderful cookie even more wonderful!) A special engraved rolling pin is used to stamp decorations into the dough and mark where to cut it into squares. If you don't have a handy-dandy springerle roller just lying about, you and use a circle cookie cutter to shape the cookies and stamp them with the fancy end of a small juice glass.


So let's get to this great recipe, shall we?!

Traditional Springerles

(Note: This recipe is property of a friend of my mother's. It is not my own.)

Ingredients

-2 cups powdered sugar
-4 eggs
-1/2 cup butter, melted
-2 teaspoons anise extract
-4 cups flour
-1 1/2 teaspoons baking powder

Directions

Beat sugar and eggs on medium speed on your mixer for 15 minutes. Add butter and anise. Mix in flour and baking powder. Turn dough out onto a heavily floured surface and divide into four equal parts. Roll each part out 1/8 of an inch thick and implant design. Slice (using the lines implanted on your dough for direction) and separate cookies. Let sit overnight on a pan covered by a thin towel. The next day, bake at 280 degrees Fahrenheit for 18-19 minutes.


Your dough will probably not be a perfect rectangle, so don't be scared to cut away nasty looking edges once you've used the roller.


Just looking at this beautiful little square of dough makes my mouth water for Christmas.


I can't wait until tomorrow, when I bake these and then devour them!! 

Tomorrow I will be back to show you how these lil' guys turned out!


Friday, December 12, 2014

It's Been Awhile...

Christmas is almost here, and I am definitely in the spirit! Decorations are up, and I've been working on presents since early November. You guys remember that overly demanding school schedule I talked about earlier? Yeah, it's never really left. (So when I don't post on here for a couple weeks, that's usually the reason. I think about you guys often, though!) Being organized about what I'm getting people has seriously saved my life this year!!

I always feel bad when I don't post on here very often, and I seriously do miss it. In order to get into more of a blogging routine, I am starting a new tradition: The Homeschooled Hoosier's Countdown to Christmas! Every day in December up until Christmas I will post something new, whether it be recipes, gift ideas, or fun seasonal crafts.


I will be back tomorrow to kick off the countdown! I can't wait!!

Wednesday, November 19, 2014

The 5 Best Teas for Fall!

An early blast of winter weather has invaded Indiana. This has baffled  everyone, and we are still adjusting to the random 15 degree weather.


Of course, if you're me, you know what that means: an excuse to drink 1-4 cups of tea a day!! (You guys know about my insane love of tea, right? Right.)  My mom and I have a whole cabinet in our kitchen that stores nothing but tea. I dug out my five favorite fall teas to remind myself that, it is, in fact, still fall. (That way I don't go off yodeling "Jingle Bells" like a deranged Julia Child.)


I hope you all like this post, because it caused a lot of more trouble than it normally does. First off, I took the picture of these teas a week ago, back when the weather was, you know, nice.  Then between my birthday, having family here, and the craziness of life in general, I finally got around to actually writing the post today. But guess what happened? When I went to transfer the picture from the camera card to the computer, the stupid card reader decided that working was overrated. So I had to load everything outside to my front porch and squat in the snow with my iPad to get this picture. I came back inside with a frozen rump and squealing, "I better get a jillion page views or something!!"


And what better way to warm up from all this craziness then a cup of one of these teas, am I right? :)


The 5 Best Teas for Fall

#5: Stash Chocolate Hazelnut Decaf

When I was younger, my mom used this decadent tea to get me started drinking tea.  It's almost like drinking Nutella! (Which is another one of my favorites. Nutella tea = happy happy Hannah!)

#4: Twinings African Rooibos Red

This tea is is divine. Its rich, sweet, and almost smoky flavor makes this tea fabulously unique.

#3: Twinings Chai Hazelnut

My mom and I are suckers for anything Chai. Just add some milk to this delicate tea for an amazing treat! (I'm drinking this right now as I type!)

#2: Beans and Baristas Cinnamon Orange Spice Decaf

There is a sweet little tea/coffee shop in the Eastland Mall in Evansville, Indiana that sells this sweet and spicy tea. They have all sorts of teas there, but this one is a favorite of mine for fall.

#1: (the best fall tea!) Stash Pumpkin Spice

I'm sure you all are SO surprised to see Pumpkin Spice anything on the list. (Not!) Yes, I am hopping on Pumpkin Spice bandwagon with the rest of the world. But, hey! What other tea describes fall so perfectly?

I hope you all stay warm! Let me know what your weather is like in the comments!


Friday, October 31, 2014

Happy Halloween!

Boo to you!

It's a dreary and cold day -in fact, there's a chance of snow this evening- but that does not change that it is Halloween!

Every year, no matter the weather, we will get dressed up in a fabulous costume and tromp through the neighborhood for loads of candy. Not just the trick-or-treaters get into the spirit (pun intended), but the hander-outers do too! There is always someone dressing up as a dummy and coming to life. Last year, when someone did that to my friends and me, I yelled at him! Needless to day, we didn't get any candy from that house. Oops.

Anyway, Halloween shouldn't be just about the costumes and the decorations. Here is a sweet and simple recipe sure to be a hit with your goblins and ghouls!

Slime Cookies

Ingredients

-1 roll store-bought sugar cookie dough
-1 and 1/4 cups powdered sugar ( give or take)
-3 tablespoons milk (give or take)
-3 drops neon green food coloring

Directions 

Bake cookies according to package directions. While your cookies are cooling, whisk powdered sugar, milk, and food coloring together in a bowl. You might need to add more powdered sugar or milk if you think the mixture is too runny or too hard. The mixture should be gooey, slightly runny, and slimy green. Once cookies are cooled, use a teaspoon to put "slime" mixture on cookies. Let icing set for about and hour and a half and enjoy!

Note: you can use a spoon to make a "splat" design on your cookies. They are supposed to look messy, so they don't have to be perfect!


Happy haunting!


Wednesday, October 29, 2014

Something New...

I have something new I'm sure you all will like! 

Drumroll, please.... 

Okay, I'll tell you. You can now follow me with Bloglovin'! Just click on the button on the top of my page, by my most recent post. I hope you all follow me!!

Thanks, friends!

Wednesday, October 22, 2014

Kickin' Vegetarian Tacos

Everyone loves tacos, right? Well, this recipe at least! It is one of my favorite original recipes. I use two of my other recipes to make the filling, so you are getting three recipes in one post! SCORE!!

First, we're going to start off with some homemade refried black beans. These are super duper easy to make, and full of flavor. Just throw a can of rinsed black beans in a skillet with some butter and spices, then mash them up with a spoon. YUM!!!

Here's the official recipe:

Refried Black Beans

Ingredients 

-1 can black beans
-2 tablespoons butter
-1 teaspoon garlic powder
-1/2 teaspoon onion powder
-1/2 teaspoon chipotle pepper

Directions 

Drain beans. Melt butter in a skillet on medium heat. Add beans and spices. Stir and smash bean mixture with a spoon until it is your desired smoothness. Serves two.


Now that you have the beans taken care of, you can move on to the other essential part of any Mexican meal: spicy, flavorful rice. (My favorite!)

This rice recipe was created by my mom way back when. It has always been pure heaven for me, and I just jazzed it up a bit when I created this taco recipe. I hope you like it as much as I do!!


Fiesta Rice

Ingredients

-1 cup brown rice
-1 cup water
-1/2 cup frozen corn
-3 tablespoons low sodium taco seasoning
-1/4 cup green chiles
-Colby jack cheese, for topping

Directions

Cook rice according to package directions. Add corn, let sit for 5 minutes. Stir in seasonings and chiles. Top with cheese and serve. Serves four.


Those two simple recipes are the fillings of our tacos. Once you have these, it's time to open up your very own taco assembly line!

Kickin' Vegetarian Tacos

Ingredients

-1 tortilla
-Refried Black Beans (above)
-Fiesta Rice (above)
-1 tablespoon sour cream (optional)

Directions

Spread as much as desired Refried Black Beans on your tortilla. Top with Fiesta Rice. If you want, you can put some sour cream on top.


Enjoy!!


Monday, October 20, 2014

Pie Champion!!

I have been officially named the Best Pie Maker. (Of my church, at least.) My church's Fall Festival was a couple weeks ago, and we volunteered to help. The day before, we found out that they were holding a pie contest. My first thought: peanut butter pie. My second thought: I'm going to cream those old church ladies like softened butter and sugar. (Real good Christian attitude, don't you think?) Anyway, I whipped up a pie, and it turned out fabulously.


Peanut butter pie has ALWAYS been my weakness and this one just took the cake. Er, pie. I took it to the festival, and it became pie number 83 (there weren't 83 pies, it's just a random number) and I waited.

And waited.

And waited.

Until finally a priest announced the best non-fruit pie goes to: pie number 83!!! So I went up and got my ribbon, trying to hold in my happy dance, and then I found out that I ALSO won best overall pie!!!!

I couldn't hold in my happy dance there.


Wednesday, September 3, 2014

Photography!

Hello everyone!!

Photography is one of my favorite activities, so of COURSE I was very excited to enter my photos in our county fair. I did very well, and my pictures made it to the state fair!!!! After the last day of the fair, 4-Hers can start taking pictures for their next entry to the fair.

This morning, I took some pictures in hopes that some of them might contribute to next year's photography project.  The sun was just coming up (I'm an early riser); fog was drifting through the air. Also, the spiders must have been busy last night (creepy-crawly! ew!), because the sun caught a ton of beautiful spiderwebs just right.  I got some great pictures!


Here's our first little web- spun between our deck posts!


These little spiders must've been bungee jumping between trees!


This spider had to have gone back to college for his engineering and architect major!!
(Hard to see from the picture, but this web is 3-D!)


The itsy-bitsy spider has some artistic vision...


And I couldn't miss a chance to take a pic of my sweet little kitty.


Hope I've inspired you to take some pictures of your own!


Sunday, July 13, 2014

How to dry fresh herbs- quick and easy!!

Hi everyone! If you're like me, and you LOVE gardening, then I'm sure you're wondering about the quickest and easiest way to dry your fresh herbs. Some recipes call for fresh herbs and spices, but dried is the most common. Having an herb garden and this step-by-step how to on hand will make your cooking more flavorful and convineint!

Quick and Easy Herb Drying

Step One:    Pick several large sprigs of your desired herb from your garden.

Step Two:   LIGHTLY sprinkle herb sprigs with cool water. Shake vigorously and pat with paper towel to dry.

Step Three:   Lay a paper towel on a plate, place herbs on towel. Cover herbs with another paper towel.

Step Four:    Microwave herbs for 10-20 seconds or until dry and slightly stiff. NOTE: Microwaving might require longer times if your herbs are still damp from steps two and three.

Step Five: Cut leaves of dried herbs of the stems and crumble into small pieces. Boom! You have dried herbs in a matter of minutes!!

XOXO,
Hannah


Tuesday, April 1, 2014

Tuesday, April 1, 2014

Since today is April Fool's Day I'm going to list my top ten favorite pranks ideas!

Prank #1: Fake Milk

Mix cornstarch with warm water and set in fridge until cool. Unsuspecting Fool will drink it thinking that it's milk!

Prank #2: Plastic Wrap Door

Cover a doorframe with plastic wrap! Fool will walk through and get tangled up in a plastic mess!

Prank #3: Monster In The Closet

Hide in Fool's closet before they enter the room. Let them be inside the room for a few minutes, then jump out and yell, "April Fools!"

Prank #4: Snack Time

Fill an empty mayonnaise jar with something that looks like mayo, such as greek yogurt. When Fool enters kitchen, take out mayo jar and start eating! Fool will think you are eating mayo! (This can be done in another way too: Give Fool a bowl of "yogurt" that is really mayo!)

Prank #5: Rainbow Hair

Put a few drops of your desired color food coloring into Fool's shampoo. Fool will have colorful hair!

Prank #6: Ghost In The Hallway

Tell your Fool a super scary ghost story before bed. Then, around midnight, get up and start playing creepy music. The Fool will wake up and hear the music. Put a white sheet over your head and barge into the Fool's room. The Fool will be so scared!

Prank #7: Bad Breath

Sprinkle a little garlic powder on the Fool's toothbrush. When Fool brushes his/her teeth, they will get a nasty flavor!

Prank #8: Rise And Shine

Set your Fool's alarm clock so that it is several hours ahead. Fool will wake up early in the morning and start to get ready for the day at 2 am!

Prank #9: Spicy Sandwich

Make Fool a sandwich and put on loads of hot sauce. Fool will beg for a drink, so give he/she Fake Milk (prank number one.)

Prank #10: Cold Cloth

While Fool is sleeping, put a cold, wet washcloth on Fool's neck. Fool will freak out!

Happy Pranking!!!

Thursday, March 27, 2014

Thursday, March 27, 2014

WOOOHOOOO!

Yesterday I finished writing my book! It's ten chapters long with an epilogue. I'm really excited about it. There is still work to be done on it, like editing and things like that. Writing the book was just the first step. I didn't start working on my original recipe or my Easter dress, but it was worth it because I finished my book!

Today after school I will start with the editing. I find that editing things is sometimes harder than actually writing them, because I tend to overlook small errors and grammactical issues. Also, I still haven't come up with a name for the book. I have a couple in mind, but I can't decide.

I know I shouldn't get my hopes up, but I just can't help thinking about what would happen if my book gets published. My dream is that I will get a bunch of money from the book so I can open my teashop. Then I can write more books for people to read while they drink tea in my teashop! This is just all so exciting!

I think that this calls for a celebratory mug of tea!!

Wednesday, March 26, 2014

Wednesday, March 26, 2014

What do you get when you mix school with cooking, sewing, and writing a book?

My very busy schedule.

Today I have to do a full day of school, start working on my own original recipe (which I will post as soon as I perfect it!) and get going on sewing my Easter dress. Aaaah! Also, I am getting seriously close to finishing my novel. I've been writing so much these past few days that I have this inky taste in my mouth that won't go away. So far, I have finished nine chapters of my book, which rounds out to a nice even fifty pages. Whoop whoop! That may not sound like much, but I've been writing all this on my typewriter, which means it's single spaced on both sides of the paper.

I'm just a bit proud!  Can you tell?

As soon as my book gets published (cross your fingers!) I will tell you guys all about it!! Writing the book has been surprisingly easy. Whenever I've read thick books I always thought, "Wow! So much hard work and concentration must have gone into this!" But now, after writing a book longer than eight pages, I can seriously respect everything that goes into writing a book. Hats off to any authors in the audience! Whenever I am writing something exciting going on in my story, I always get caught up into it such that I find myself with cramped fingers, a little sweaty, and slightly out of breath. I hope my future readers will enjoy my book!

This book has me very excited, and I am serious when I say it is literally the best thing I've ever written. I've started other stories with intentions to make them into big long books that get published, but I've never followed through with them. It feels so good to be doing this!


Tuesday, March 25, 2014

Tuesday, March 25, 2014

It's the fifth day of spring and it's SNOWING. This does not make me happy.

I'm in the home stretch of finishing my book, but since Spring Break is over, I can't spend entire days at my desk writing like I did last week. I'm almost twitching to get back to work, but I have to do school so I can, you know, finish fifth grade. You could say I'm going through Writing Withdrawal. (Is that a thing...?)

This week I will probably be spending more time at the sewing machine than the typewriter. I have a bunch of fabric for pillows in my room that I need to make, and also I need to start working on my Easter dress. I usually don't like wearing dresses and things like that, but I make an exception for Easter and sometimes Christmas. This year my Easter dress will be really geometric and modern. I found some cool green, navy blue, and white fabric on sale at JoAnn's that I had no idea how to use but I just couldn't live without it, so we decided to make a dress out of it. Let's hope it turns out well; I don't have much sewing experience.

Since it's so cold and nasty out, I thought I'd share a warm, creamy recipe.

World's Best Homemade Macaroni and Cheese

Ingredients

-1 pound elbow macaroni
-Milk
-4 to 5 slices American cheese
-shredded Colby Jack cheese

Directions

Fill a saucepan with water. Bring water to a boil. When the water is boiling, dump in the macaroni. Cook macaroni according to package directions. Drain macaroni, set aside. In your saucepan, pour enough milk to thinly cover the bottom of the pan. Put in cheese slices. Stir until the mixture is smooth and creamy.  Pour in hot macaroni and stir to coat macaroni with cheesy mixture. Sprinkle shredded Colby Jack cheese on top and serve.

Monday, March 24, 2014

Monday, March 24, 2014

Spring Break is officially over and my Read-athon was a huge success! I checked out nine books and read seven of them. I had hoped that I would finish all of them, but since I'm working like crazy to write my own book I think my accomplishments are nothing to sneeze at.

My book is coming along fabulously, and I am very excited about it. I seriously think that this one has a good chance to be published. There's one problem though: I don't have a publisher. I've been doing a lot of research, but this is all still so new. Does anyone know anything at all about the publishing world? If so, please tell me!!

Another thing coming up that is super exciting is that I am working on making a new page on here for all the recipes I post! It's still being worked on so the new page will be up and running soon.

I hope you all are enjoying my blog, because I love coming on here and writing!

Thursday, March 20, 2014

Thursday, March 20, 2014- The first day of spring!

Finally! Today is officially the first day of spring, and it's about time!! We had been slammed by several several several annoying winter storms. And let me tell you this: snow is fun... the first time. After the holidays, a foot of snow and negative temps are not magical anymore.

I am welcoming the new season by opening the windows, wearing springy earrings and clothes, just plain enjoying fifty degree weather. I will defintily be taking my Spring Break Reading Marathon outside today!

Spring has always been my favorite season; I like warm weather but I don't like it too hot. Spring is like a happy medium. Also, spring fashions are always fabulous! I just love all the flowy scarves and flowery designs.

To honor the badly needed arrival of spring, I'm going to post some wonderful springy recipes today that use foods from our garden. Freshly grown foods from right outside your kitchen make everything taste better, don't you think?

Berry Fresh Strawberry Pasta Salad

I've mentioned before that pasta is my weakness, so this recipe tops the charts for fruity sweetness and the savory-ness of pasta. It's one of my favorites, and especially handy when your strawberry bushes go crazy during the summer and you're up to your ears in strawberries. (That's what happened to us last year!)

Ingredients:

-1/2 pound cooked bow tie pasta, drained and rinsed with cold water
-1/4 cup chopped walnuts
-1 cup fresh sliced strawberries
- 2 cups Brianna's Home Style Blush Wine Vinaigrette Dressing (has a picture of a strawberry on the front)
-1/3 cup Romano, Asiago, and Parmesan cheese blend

Directions:

Mix together ingredients in a large bowl. Refridgerate until needed. Refridgerate any leftovers. Enjoy!


Super Duper Delicious Green Beans

This recipe is a creation of my mom's, combining our love of green beans, oregano, and garlic. Wonderful with freshly picked herbs!

Ingredients:

-1 pound fresh green beans, trimmed and cut
-1 teaspoon oregano
-1 teaspoon garlic, minced
-1 teaspoon bacon grease
-pepper, to taste
-1 cup chicken broth
- 1/2 cup red bell pepper, diced
-1/2 cup onion, diced

Directions:

Melt the bacon grease in a warm skillet. Add the pepper and onion. Saute for about a minute. Add garlic. Saute for another minute. Add green beans and stir to coat. Add oregano. Add chicken broth. Reduce heat to simmer. Cover skillet and simmer until beans are to your liking of tenderness. (15-20 minutes.) Add pepper to taste and serve!

Enjoy these great recipes and the lovely spring day!

Wednesday, March 19, 2014

Wednesday, March 19, 2014

It's halfway through my Great Spring Break Reading Marathon and I have already read five thick books. I hope that nine books I checked out from the library will last me through the week!

Speaking of books, how are you all doing on our March book? So far I am loving it! It's about the middle of the month, so write in and tell me what you think of the book! Here are some things you can write about:

What chapter are you on?

Who is your favorite character?

Do you like Ms. Meehan's writing style?

What do you think will happen in the story?

I look forward to hearing from you, so please write in!!!

Along with my reading marathon, we are redoing my room during the week that we have off from school. My room has been painted the most perfect light aqua color, and we will be painting baseboards and doors white today. (We need to repaint the doors and baseboards because they are all scratched up from posters and furniture.) 


This picture makes the paint look more greenish than it actually is because of weird lighting, but I'm still excited!


Since my room is torn apart, I am currently "living" in our game room, which is stacked full with furniture!


I have a big announcement to make: I am writing my first novel! I'm very excited about it, and I've already typed up eighteen pages, front and back, on my typewriter. (Yes, I have a typewriter. What can I say? They're cool!) Those eighteen pages make the first three chapters, and I am positively bursting with more ideas! I've never been published before, and I'm going to be honest, I have no clue what I'm doing. Does anyone have helpful hints about how to get published??? 

Since I'm so motivated about writing my novel now, I am hoping that I will at least have the rough draft written out by the end of the year. That means that after writing a book that I'm hoping will be at least a hundred pages, I have to edit it, type it up on something besides my typewriter, send it in to a publisher...  and who knows what from then. This is going to take longer than I thought.

Wednesday, March 5, 2014

Ash Wednesday recipe

Hi! Today is Ash Wednesday, which marks the beginning of Lent for Christians. Today and Fridays during Lent my family doesn't eat meat, so I'm posting a great meatless recipe that is full of flavor and delicious!

Tuna Pasta Salad 

Mom and I thought up this super healthy recipe. We don't use measurements, so I'll just list the ingredients and you can add amounts to taste.

Here are the ingredients:


Red Pepper
Peas
Carrots
Canned Cannellini Beans, rinsed
Packet of Tuna
Black Pepper
Canned Sun-Dried Tomato Pesto
Shredded Parmesan, Asiago, and Romano Cheese Blend
Olive Oil
Cooked Pasta, drained and rinsed with cold water

Mix ingredients and enjoy! Refrigerate any leftovers.


Bon Appétit!

Saturday, March 1, 2014

Saturday, March 1, 2014

It's officially March. That means only a couple weeks until spring. It almost seems unreal. Last week, we had a couple warm days. I wore shorts outside, and now I wonder if that will ever happen again. On Monday, we are expecting more snow. MORE SNOW. I'm past being done with winter, in fact, I'm flat out ANGRY with it.

On the bright side, Spring Break is coming up in a couple weeks. Spring Break is big for my family; it's the one time of year that we go on vacation.  This year could be different, though. My sister is taking a camping trip to Florida with one of her religious social groups for a whole week. Seven days relaxing on the beach, swimming in the ocean, and enjoying WARMTH. I'm not jealous. Really. (Okay, I'm crazy jealous.) Mom, Dad, and I haven't planned to do anything, but I'm more okay with it than I thought I would be. 

The best part about Spring Break is a tradition that I honor every year. Wether we cram into the car and travel or stay at home, I always spend Spring Break with my nose in a book. (It's usually more like multiple books, though, because I'm a fast reader and can easily read three to four three-hundred page books in the week that we get off.) The reason I choose Spring Break for my annual read-athon is that after the long winter, I crave new books to read. During the winter, we don't like checking things out from the library because of all the nasty cold and flu germs. By Spring Break, I'm usually all but twitching from new book deprivation. This year, though, I'm having trouble deciding on what to read. Anyone have suggestions?

If you're like me and you love a good book, then I have a treat for you! Introducing the Homeschooled Hoosier Online Book Club! Every month, I'll recommend a book. At the end of the month, I'll give a review of the book that we've read. Since today is March 1, I'll go ahead and announce this month's book.

March's Book: Hannah's Winter by Kierin Meehan


I chose this book because I find the Japanese culture very interesting, and also to honor our seemingly never-ending winter.  It's about a girl named Hannah who is in Japan staying with the family of her mother's friend. She and her new-found friends discover an ancient message, which leads to spectacular adventure and mystery! 

Curl up with a cup of tea and enjoy!

Thursday, February 20, 2014

DIY Jean Vest

Have you noticed how one of the great up and coming spring trends is the jean vest? I love them; they're so versatile and add a nice splash of chic to almost any outfit.

Here's a great way to look fabulous in your own jean vest while saving CASH!!

DIY Jean Vest


You will need:
-An old jean jacket
-Fabric scissors (found at craft and fabric stores)

Carefully use fabric scissors to cut the arms off of the jean jacket. Be sure to cut as close to the seam as possible without cutting the actual seam. Voila! You have a totally stylish jean vest!

Suggestion: if making this for a child, don't use a jean jacket that still fits well and is used frequently. For my jean vest, I used an old hand-me-down jacket that still fit fine in the width and length, but the arms were too short.

Pair your jean vest with a simple white top and fun-colored shorts for a classic, airy look. My shorts have floral eyelet details that looks really cool and feminine.


 Wear your jean vest over a flowy sundress with bold colors and metallic silver sandals for a tough-but-girly look.


A loose, pleated skirt with a simple floral pattern and a plain tank top look really sweet with the vest. I used the same metallic silver sandals that I wore with the previous fashion. You can wear your vest unbuttoned with this outfit, but I recommend wearing it buttoned about halfway up.


You don't have to copy my outfits to be stylish in this vest. Wear it the way you like, and that's when it'll look the best! Stay stylish!