Pages

Tuesday, July 7, 2015

Tutorial Tuesday: Chalk Paint End Tables (Part One)

I recently inherited two identical end tables from my great-grandfather. They are brown and bland; not my taste! The first time I saw them, I immediately knew that they were crying out for some D.I.Y. magic. The answer? Chalk paint!


Chalk paint is amazing, in a nutshell. No sanding, no stripping, no priming, no preparation whatsoever! Just make sure your piece is clean and dry and you're good to go! I bought my chalk paint from American Paint Company (click here to browse their site!) and it went on like a dream. Just a 4 ounce jar of paint covered both of my tables!

You might notice from the title of this post that is T.T. is a two-parter. Therefore, the 'after' picture above is what the tables look like after I applied the first coat of chalk paint. I applied one coat of white chalk paint first, and then I will paint over the white very lightly with a color of chalk paint and then a clear finishing wax.


For my colors, I'm using (left to right) Purple Mountain Majesty, Beach Glass, and Navajo White. Only Navajo White is used this week.


Here is a picture of the Vintage Antiquing Wax I will use to finish the tables. I got the clear variety.


If you have end tables like mine that you've been wanting to paint, use these tips from this week and next week!

(Note: The directions and supplies below are are specific to this week's tutorial. Also, you can adjust the amount of paint or color of paint based on your project.)

Chalk Paint End Tables

Supplies

-2 end tables
-1 four-ounce jar American Paint Company Navajo White chalk paint
-1 one-inch paintbrush

Directions

Make sure that your tables are clean and dry. Dip your paintbrush lightly in the paint such that the tips of the bristles are covered with paint. Paint your tables with smooth, even strokes; making sure to blend your strokes together. A little of this paint goes a very long way, so use as much of the paint off of your brush as possible before refilling it. Once you have covered your tables in one layer each of paint, allow to dry overnight. 


I hope y'all are looking forward to next week as much as I am! Let me know in the comments if you have any questions about the paint, tables, or method of painting.  Happy DIY-ing!

Tuesday, June 16, 2015

Tutorial Tuesday: Italian Delight

This easy recipe was passed down to my mother from my grandmother, and it is the epitome of comfort food! My mother remembers this being her favorite meal when she was a little girl. I hope you enjoy this crowd pleasing dish as much as my family does!


Italian Delight

Ingredients

-1 lb ground sirloin
-1/2 lb elbow macaroni
-1 jar spaghetti sauce
-1 1/2 cups frozen corn
-Pepper, to taste
-Italian seasoning, to taste 
-Cheese of your choice; the original recipe called for Kraft singles. (optional)

Directions

Cook pasta according to package directions, drain and set aside. Brown ground sirloin and season to taste with the pepper and Italian seasoning. Add corn, spaghetti sauce, and macaroni to skillet with meat. Stir and heat through, about 15 minutes. Top with cheese and serve.

From my family to yours, enjoy!

Tuesday, June 9, 2015

Tutorial Tuesday: 5 Tips for Amazing Photos with Nature as your Background

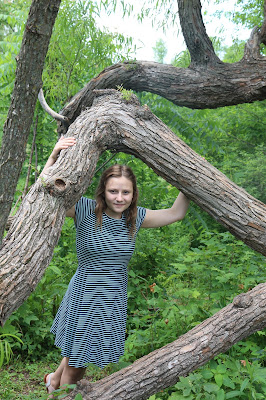
As you might already know, I enter a board of ten photos in my county fair every year. This year, I have earned the opportunity to also enter a large individual photo (like something you might see in a museum). Since my ten pictures are pretty much all nature shots, I teamed up with my long-time friend Grace to enter a different sort of picture for my larger photo!

For today's TT, I'm using those photos to give y'all a couple of my best tips on taking portraits outside!


Tip One: Plan Ahead.

Think about what you want to capture in your photos. Since it is summer, I wanted to show the beautiful light and airy vibe that nature produces this time of year. Therefore, we did the photoshoot on a sunny day, in a nature park; and Grace wore delicate-looking clothes with light hair and makeup. 


Tip Two: Pose your Model Naturally.

Candid shots usually turn out the best, so make sure that your model isn't too posed. Looking away from the camera, or just barely glancing at it, makes your photo look more natural and comfortable.


Tip Three: Use Nature as your Props.

This tip goes hand-in-hand with the previous one, and here's why: extra props in your nature photos give away the secret that it's posed! 


Tip Four: Get the Big Picture

Although your model is the star of the show, make sure that you capture the beauty of your background! If I had just zoomed in on Grace's head/shoulders or feet, you wouldn't have seen the interesting surroundings.


Tip Five: Look  for Interesting Backgrounds

Since nature is full of amazing things, keep an eye out for unusual trees, flowers, fields, etc. to add interest to the background of your photos. Both the picture above and below are of the same huge tree, which we hopped a fence and ducked under branches to reach! The pictures turned out mysterious and interesting, so it just goes to show you how a creative eye is a photographer's best friend!


Let me know which is your favorite photo in the comments! 

Thursday, June 4, 2015

Mediterranean-Insipired Salad with Garlic Oregano Dressing

Let's talk about salads. You can put anything on them, just as long as you have some sort of leafy green underneath. I like to think of the salad as a road to what you would rather be eating, for example: craving a gyro or some other sort of yummy Mediterranean dish? Make this awesome Mediterranean-Insipired Salad!


Seasoned chicken, carrots, red bell pepper, crunched pita chips, chickpeas, and shredded parmesan cheese are the toppings I used, but you can put whatever you like on your salad! Recipe below!

Mediterranean-Insipired Salad with Garlic Oregano Dressing

Ingredients

Chicken:
-2 small chicken breast, diced
-1 tablespoon olive oil
-1/4 teaspoon garlic powder
-1/2 teaspoon oregano
-pepper, to taste

Dressing:
-1/4 cup olive oil
-2 tablespoons fresh oregano
-1 1/2 teaspoons minced red onion
-3/4 teaspoon minced garlic
-1/4 teaspoon black pepper
-1 1/2 teaspoons lemon juice
-1 tablespoon parmesan cheese, grated
-1/2 teaspoon honey

Salad:
-Chicken (above)
-Dressing (above)
-Romaine lettuce
-crunched pita chips
-shredded carrots
-shredded parmesan cheese
-chickpeas
-red bell pepper, diced

Directions

Saute chicken in olive oil with herbs until cooked through. Set aside. Place all ingredients for dressing in a jar. Seal lid tightly and shake until combined. Set aside. Prepare desired salad ingredients and arrange on plate with chicken. Drizzle dressing over and toss. Serve.


I hope you enjoy this healthy and delicious salad as much as I do!

Tuesday, June 2, 2015

Tutorial Tuesday: Sun Tea

When I think about summer, the first thing that always comes to mind are the heat waves that usually last from early July to mid August. The grass turns yellowish brown, fire and water bans are put into place, and Independence Day fireworks become a bit nerve-wracking for those of us who actually listen to the fire ban.

Luckily, we Hoosiers have a foolproof way for staying cool: always keeping a big jug of ice-cold sweet tea on hand. My grandmother has shown this fun way of letting the sun brew your tea for you, so now I'm showing y'all! Tutorial below!


1)First things first, get yourself a quart-sized jar. Put two family sized tea bags inside aforesaid jar. (I use Luzianne brand.) 

2)Fill the jar with water.

3)After that, simply seal the jar and sit outside in a very sunny area. 

When the tea has finished brewing (about 6-7 hours) it will be similar to this color:


4) Pour jar of tea into a 2-quart pitcher. 

5)Add desired amount of sugar/sweetenter. (Optional)

6)Fill empty jar with water and add to pitcher of tea. Refrigerate.


Pretty easy, am I right? Hope you enjoyed this Tutorial Tuesday!

Wednesday, May 27, 2015

Tutorial Wednesday: How Completely Screw Up Tutorial Tuesday

It's Wednesday. Yesterday was Tuesday. Tutorial Tuesday to be exact. Only the second one ever. As you can tell, I missed it.

Fabulous.

Today, I am attempting to make up for my poor time management skills by doing a Tutorial Wednesday. (Just doesn't have the same ring to it, does it?) Well, I have discovered that Tutorial Wednesday is a flop. A big flop, to be exact.

I had big plans for this, make-up day: I was going to make cute little picturesque mini fruit pies. Sounds delightful, right? Like your typical recipe blog post? Wrong.


Look at that carnage. Pretty bad, right? These "cutesy little pies" (or, as my mother and I prefer to call them, Lil' Craps) took me two hours to mess up. I found a pie crust recipe. The pie crust recipe was horrible, but I kept on. I made a mixed berry sauce. It proceeded to be thin and sugary. I stuffed that dense crust full of my diabetic sauce, put some little fork marks around the edges to at least try to make them look somewhat blogger-ish, popped those suckers in the oven and hoped that they would turn out in the end.


As you can tell, they didn't.

The Lil' Craps were heavy-duty cemented to the baking sheet. A crowbar, sledgehammer, WD-40, and a lightsaber eventually got them off the pan (which was immediately drenched in Mr. Clean spray and sent off to therapy) and we tried them. Very bad idea. They tasted like cardboard soaked blue Kool-Aid. I'm guessing, by now, you can see why they have been deemed the Lil' Craps.

Oh well, I'm only human! At least it was fun to ridicule them.

Next week, I'll come back swinging with a killer T.T.!


Thursday, May 21, 2015

DIY Colorful Sunburst 4-Panel Wall Art

For all practical purposes, it is summer. The days are hot.  The nights are short. School is *this* close to being out. While all of these things are awesome, my very favorite part of summer is all the color it brings! Think about it: flowers are blooming, grass is green, and everything is bright and happy.

I tried to capture those awesome summer colors in this super-cool, super-easy four-panel wall art.


(Note: Because of the lighting I used to take this photo, the tape used to hold the panels together is very visible. In person, it's not as noticeable.)

DIY Colorful Sunburst 4-Panel Wall Art

Materials:

-Four pieces of paper, cut into 8 1/2 inch squares
-Sharpie markers
-Scotch tape
-Yarn
-2 clear pushpins

Instructions


In the center of your paper, draw a small sunburst (a colored-in circle with tight rays around it).


Slightly overlapping with the original sunburst, use a different color to make the sunburst bigger. For a really cool fading kind of look, make the edges of your growing sunburst a bit uneven. Make sure that the new color doesn't clash with the color before it.


Continue this method, using different colors each time, until your square is almost full. Do this on all four squares, using different color patterns each time.


Take two of your panels, with a little bit of room in between, and place two pieces of tape as pictured above so that the panels are connected. Flip the panels over, and place tape on the same places so that there are no sticky parts forward. Repeat on the other two panels.


Repeat the above method so that all four squares are are connected. In the center, the tape should look sort of like a square (pictured above).


Cut two pieces of yarn, about 12-14 inches each, and tape them in an upside-down V on top of each column of panels on the backside.

Hang your panels wherever you like using the two pushpins. Ta-da! Summer-y, colorful wall decor to spruce up any room!

Happy crafting!


Tuesday, May 19, 2015

Tutorial Tuesday: Easy & Relaxed Low Bun

The big hair trend this year seems to be looking effortless. Unfortunately, the effortless look isn't quite as easy as it sounds. That simple low bun that has been on the trendy list? Requires a ridiculous amount of product and styling.

I'm not exactly into that.

Lucky for all of you following the boho bandwagon, I reinvented the low bun. No pre-hairstyle curling. No crazy amount of time and energy. Just an honest-to-goodness low bun!


Here's the tutorial below:


Start with slightly damp hair, brushed out smooth.


Put hair into neat low ponytail.


Use your finger to twist the ponytail.


Tightly wrap the twist around the ponytail tie. Pin in place with bobby pins. Pin any major flyaway strands of hair around the bun, as well.


Pull out a few strands of hair to frame your face. Voila! Relaxed low bun!


I hope you enjoyed the first ever Tutorial Tuesday! 


I'm Back! (With Tutorial Tuesdays!)

If you're happy and you know it, clap your hands. *Clap clap.*  If your life is too busy for you to have time for your hobbies clap your hands. *Clap clap.*

How long has it been... since March, right? I guess my New Year's resolution of being a more faithful blogger hasn't exactly panned out. Sigh.

Stick with me, guys; I'm trying something new: Tutorial Tuesdays.  Every Tuesday, I'll post a new how-to, about photography tips, fashion inspiration, and everything in between. With that in mind, I will be back later today to debut Tutorial Tuesdays! Let me know what you think in the comments!

Thursday, March 26, 2015

Rich and Dreamy Mini Chocolate Pies

You know what's scary? Not blogging in over a month. You know what's even scarier? The amount of things that have happened in that month. I've had rehearsals, meetings, a grandma fall and break her leg... shall I go on?

In the midst of all that, I found time to create these little cups of heaven yesterday!


A graham cracker crumble on the bottom, silky thick chocolate pudding, and whipped cream on top. What's not to like? Oh, and there's a bonus! These little yummies are totally easy to make! Can I get an AMEN?!


Here is the recipe for y'all! Make this ASAP, you won't regret it!

Rich and Dreamy Mini Chocolate Pies

Ingredients

Crust:

-5 rectangular graham crackers, broken in half
-2 tbsp butter, melted

Filling:

-1 1/2 cups half-and-half
-2 cups chocolate chips (I used semi-sweet)
-2 tbsp butter
-2 tbsp cornstarch 
-4 tsp water
-1/2 tsp unflavored gelatin powder

Toppings:

-1 cup heavy whipping cream
-1 tbsp powdered sugar
-rainbow sprinkles (optional)

Directions

Pulse graham crackers in food processor. Add butter; mix. Press evenly into four oven-safe crocks (straight-sided, preferably) to coat the bottom of the crocks in the cracker mixture. Bake at 350 degrees Fahrenheit for 10 minutes. 

While the crust is baking, melt half-and-half, chocolate chips, and butter together on stove in a medium-sized saucepan. In a separate bowl, mix together cornstarch and water. Add cornstarch mixture to chocolate mixture. Add gelatin powder. Stir until all is evenly combined and begins to thicken. Take off heat and chill in the refrigerator for 30 minutes. Pour chocolate mixture into graham-mixture crocks, and refrigerate for 2 hours.

Fifteen minutes before serving, pour heavy whipping cream and powdered sugar into mixer. Mix on high speed for 7 minutes or until there are stiff peaks. Spoon whipped cream onto chocolate mixture in your crocks. Add sprinkles (optional). Serve.


Enjoy!


Wednesday, February 25, 2015

Strings Appreciation Post

So, have I mentioned lately how much I love string music? Anything played by an upright bass, cello, viola, or violin makes me happy :)

Some of you might remember that I play the violin. Well, I took a big ol' step out of my comfort zone and auditioned for an orchestra after five years of playing. After three months of worrying and practicing and worrying some more, I had the judges stop me halfway through the piece telling me I got in. Obviously I was happy, but after that amount of time practicing I wanted to tell them to sit back down and let me finish. Oh well.

Since then, orchestra has proven to be utter bliss. I have found people who understand what a masterpiece Bach's Cello Suites are (you can listen to them here), and aren't afraid to dive into deep conversation topics such as quantum physics and philosophy.

Speaking of Bach's Cello Suites, I am completely overjoyed to announce that I am finally learning them on the violin! They are my absolute favorite pieces, and I have spent about an hour working on the first suite this afternoon. (Today, I spent probably about three hours total practicing violin.)

Just to show how much I love violin, I took some glamour shots this evening. Enjoy looking through them!


Saturday, February 21, 2015

Our First Snow

Wow! It has been a long time, hasn't it? I have been on blogging hiatus for the past couple of weeks because of all the craziness going on in my family: my great-grandfather past away, my first orchestra practices, and juggling it all with -you guessed it- my overly busy school schedule.

The craziest thing, however, has been our first heavy snow all winter long! Nine inches of snow has fallen in the past week, canceling school. Normally, this wouldn't affect my mom and me because of the whole "homeschool" thing, but having my sister home and the first snow all winter has proved to be a greater distraction than expected. 

Here's a candid photo I shot with my iPad:


Moment of silence for the ruler I lost while trying to measure the snow. It'll turn up. Eventually.


Thursday, January 22, 2015

Blackberry Honey Green Tea Smoothie

I have never been a big fan of breakfast foods. I'll eat sausage, pancakes, or cereal, but I've always preferred to sit down with a big bowl of pasta. (If possible, I would live solely off of pasta. Yum.) Since that's not exactly the healthiest thing, smoothies are my go-to healthy breakfast. 


This recipe is perfect for a busy weekday morning. Just throw some ingredients in a blender, and bam! Two healthy, delicious smoothies! 


Blackberry Honey Green Tea Smoothies

Ingredients

-1 cup ice
-1 cup milk
- 1/2 to 3/4 cup blackberries
-1/4 teaspoon green tea leaves OR matcha powdered green tea
-1/2 to 1 teaspoon honey

Directions

Put ingredients in blender. Blend for 2 minutes or until smooth. If desired, sprinkle a few tea leaves on top for garnish. Serve.

Pretty easy, am I right?!

The reason why I did a range of measurements for the blackberries and honey is that in the winter, blackberries will probably be a bit more sour, so less blackberries will be used and more honey; whereas in the summer, you can use more berries and less honey. It's really up to how you like it!!

Bon appetit! 

Thursday, January 8, 2015

2015 and Rustic Apple Pockets

Happy New Year's, everybody!! It's hard to believe that 2015 is here already... my sister will be going to college and becoming an adult, and I will be turning thirteen. Lord preserve us.

Because of the crazy-cold temperatures that have descended upon Indiana, I have been spending the beginning of 2015 inside, practicing violin. I will be playing Luigi Boccherini's Minuet for my very first orchestra audition ever this Monday. No, I'm not freaking out? Why would you ask that?

(You guys know me well enough to know I'm being sarcastic, right?)

Deep breaths, Hannah...

Yesterday I got a nasty paper cut on one of my violin fingers and was unable to practice, so I came up with this great recipe for y'all!!


I know apples are more of a fall thing, but I couldn't wait until September to share this scrumptious recipe with you!

Rustic Apple Pockets

Ingredients

(For the filling)

-2 large apples
-1 1/2 teaspoon butter
-dash cinnamon
-dash nutmeg
-dash cloves
-dash ginger
-1/4 cup apricot jelly
-3/4 cup apple cider
-1 teaspoon sugar

(For the crust)

-1 1/4 cup AP flour
-1/3 cup brown sugar
-dash cinnamon
-2/3 cup buttermilk

Directions

Cut apples into cubes. Saute HALF of the apples in butter and spices, stirring, for about 10 minutes. Add fried apples, uncooked apples, jelly, apple cider, and sugar into a small saucepan. Cook for about 30 minutes, stirring occasionally. Use a potato masher to mush apples into an applesauce. 

Meanwhile, put crust ingredients into a mixer and stir. Dust a smooth surface with flour. (If dough is too dry/flaky, add small droplets of water to the cracks.) Roll into a 12-inch circle and cut into fourths.

Put about two tablespoons of the applesauce onto the fourths. (Do not fill them extremely full, or they will not close.) Fold crust over the mixture closed. Put a pecan on top for garnish if desired. Bake at 350 degrees Fahrenheit for 20-22 minutes, or until golden brown.  Serve warm with vanilla ice cream, if desired. Makes four pockets.


How cute are these little guys? They make me think of a delectable pastry that would be on the table of a country cottage in France! 

Bon appetit!